Note: To all respected NoteBurner users who have updated their macOS to the latest 10.13 High Sierra, because of the incomplete compatibility between NoteBurner M4V Converter Plus and macOS 10.13 High Sierra, you probably can not use the program under this specific program properly. But NoteBurner development team is focusing on this incompatibility issue to find the solution soon. We will post the further notice on our official sites and Facebook channel after we resolve it successfully.
If you have Windows PC at hand, we suggest you try our Windows version. You can contact our support team via support [at] noteburner.com (replace [at] as @ before sending message) and let our customer service expert change your license code to Windows version for free.
If you still want to make NoteBurner M4V Converter Plus work on Mac before the last settlement out, downgrade the macOS High Sierra to macOS Sierra is the feasible way at present. Therefore, we write this post to show how to easily downgrade macOS 10.13 High Sierra to 10.12 Sierra in a safe way.
Tips: In order to prevent the data lost after downgrading, please make sure that all important data will be back-up, so that all backup can be restored after downgrading. Just go to Apple Menu → System Preferences and use Time Machine or via iCloud and other cloud services to backup your files. Now, let's go on the tutorial on downgrading macOS High Sierra to Sierra.
Before removing macOS High Sierra from Mac machine, it is necessary to download drive for macOS Sierra from App Store. You just need to search for it if you have purchased before.
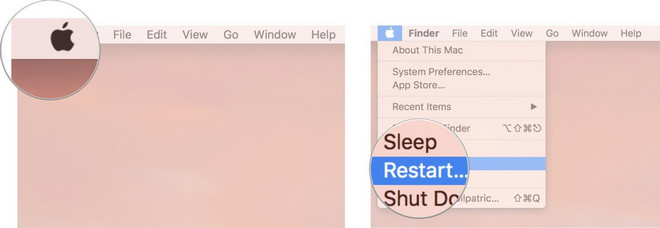
Step 1: Click on Apple icon at the top-left corner of your Mac main interface and select Restart. Just hold down Command+R when Mac restarts.

Step 2: Click Disk Utility from the OS X Utilities. Then click Continue and click Startup Disk.
Step 3: Click Erase button and enter a name for the file to be destroyed.

Step 4: Finally, select Mac OS Extended from the Format list and click on Erase.

After these 4 steps complete, quit Disk Utility from the dropdown menu in the upper left corner of the interface to go back to the OS X Utilities selector.
Now, let's take a look at how to reinstall macOS Sierra on Mac. And please make sure that the internet is connected.
Step 1: Click on the Apple icon in the upper left corner of the interface and select Restart from the dropdown menu.
Step 2: Hold down Option while your computer restarts. This will send you to the option to select a startup disk
Step 3: Select macOS Sierra from the list of startup disk options. macOS Sierra will begin installing on your Mac.
Step 4: Click Continue in the macOS Sierra installation window.
macOS Sierra will be installed now and you will agree to the licensing terms before the software reboots on your Mac. And your Mac machine will restart when the process is completed.
All the data can be restored from recent backup via Time Machine (on condition that you backup the data via Time Machine before downgrading) after you successfully reinstall macOS 10.12 Sierra.
Step 1: Click on Apple icon and select Restart from the dropdown menu.
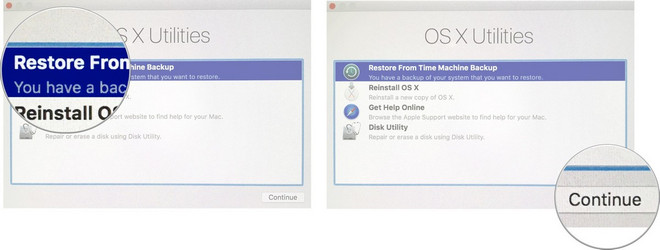
Step 2: Hold down Command+R and then click Restore from Time Machine Backup from the OS X Utilities menu.
Step 3: Select Restore from Time Machine Backup and click on Continue button to choose the most recent macOS Sierra backup on the drive.

Step 4: Click Continue to start restoring from the Time Machine backup and then reboot.
You can complete the downgrade from macOS 10.13 High Sierra to 10.12 Sierra with the steps above and you can take it if necessary. Thank for choosing NoteBurner and look forward the solution.